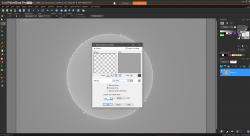
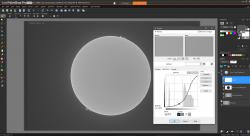
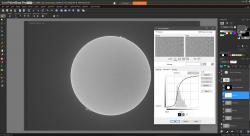
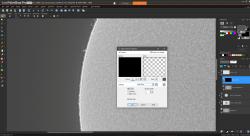
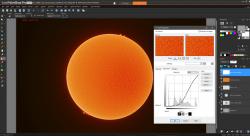
Solar imaging (Part 2)23 June 2020 (� N. de Hilster & Starry-Night.nl) In Solar imaging (part 1) I described two methods for relatively simple processing of images of the Sun using an H-alpha telescope and a telescope with a white light solar foil filter into a colour image of the Sun. Although these methods differ in detail, they have in common that both use a positive monochrome image as a starting point. Inspired and helped by a thread from Stephen Jennette on Stargazers Lounge, I started looking into the alternative: processing the data with an inverted histogram. In this way, surface details and the prominences become even more visible. This second part about solar photography is about this inverted way of data processing. [on December 3, 2022, Part 3 appeared with a much improved way of recording and simpler way of processing]  Figure 1: The normal (left) and inverted way of processing side by side. The image shows the Sun on June 19, 2 Figure 1 shows both methods side by side. In both cases, the same image from June 19, 2020, at 15:38 UTC was used as source data, recorded with a Lunt LS80THA Single Stack Etalon in combination with a ZWO ASI174MM monochrome camera. The left part of the image shows the normal processing as discussed in Part 1 of this article, the right half is the inverted method. Although the Sun was quite dull at the time of this image, the differences are immediately apparent. The inverted method made all dark areas light and vice versa. This apparently gives the Sun more structure, the surface shows more roughness and therefore more depth. In addition, with the inverted processing method, the prominences (the material bridges visible along the edge) and the surface (and thus the filaments) are processed separately. The method improves the visibility of the prominences, the surface detail and the filaments. As described above, both the normal and inverted methods work with the same source data. The recording in FireCapture and processing in AutoStakkert! therefore remain the same. ImPPGIn ImPPG processing is started the same way of as in the method described in Part 1. Again, the aim is to make as much surface detail and prominences visible as possible, while at the same time making the edge as smooth as possible, although that edge can also be adjusted later as described below. As shown in figure 2, the [inv] button (indicated in red in the image) can be used to invert the histogram. What is striking is that the prominences are immediately much more visible. It is also clearly visible that the surface has now become negative, but also that it is somewhat darker on the right side than on the left side. The latter can partly be corrected with an artificial flat, which will also be explained later [in part 3 the proper solution is given]. The inverted histogram can be further adjusted if necessary and finally the image is saved as a 16bit TIFF so that it can be opened in photo editing software. I use Corel PaintShop Pro for post-processing, but the workflow isn't much different from how it would be done in Adobe PhotoShop and is easily adaptable for anyone familiar with it. Post-processingPost-processing of the photo is done in two or three steps, depending on the width and shade of gray of the border around the Sun:
For these edits I use masks to protect parts we don't want to modify at the moment. A mask is a layer whose colour indicates which part is and which part is not passed on to the parent layer (or layers). If the mask is white, then everything passes, if it is black, then nothing. The intermediate shades of gray will pass processing to the upper layer to a greater or lesser extent. Raising prominences and darkening the backgroundIt is assume that at this point the image has just been loaded and there are no layers other than the background layer yet. Before adding masks, first a selection is needed to edit these masks. Since the method described here causes the image to be 8bit, while we want to work in 16bit, we need to make and save this selection first, so that we can apply it to the 16bit data later. By zooming in on the solar limb, we can use the selection tool to select a few pixels from this light rim (see figure 3). Then all pixels of this colour can be selected with the Select Similar tool (Selections -> Modify -> Select Similar). Bright parts of the prominences can also be selected, but since this is not desirable, we cut them off again. At this point, if the image is not 8bit, PaintShop Pro will tell that it is being converted to it. Using the Remove Specks and Holes tool (see figure 4), the current selection can then be filled inward (Selections -> Modify -> Remove Specks and Holes -> Remove Holes, 100 x 100000px), so that the entire solar disk is selected. If this doesn't work, the border may not have been fully selected in the previous step. Repeat the edge selection with a larger tolerance or manually close it, then repeat the Remove Specks and Holes tool. Since we want to achieve a smooth transition from the prominence layer to the surface layer, we add another Feather to the selection. Since the clear border is already selected, we'll only make the Feather inwards (Selections->Modify->Inside/Outside Feather->Inside, 5px). The selection is now ready for use. To this end, we now save it to disk (Selections->Load/Save Selection->Save Selection To Disk), after which we undo the edits, so that we are back at the 16bit image (shown at the bottom right, undoing can of course also be done by closing the image and opening it again). Now the background layer can be duplicated (right mouse button on the layer, choose Duplicate, possibly first activate the Layers palette with [F8]). Then add a mask to it (via Layers -> New Mask Layer, or via the New Mask Layer icon at the bottom of the Layers palette), choosing �From Image��, although this is not strictly necessary. Now the previously made selection can be loaded (Selections->Load/Save Selection->Load Selection From Disk). Then we fill the inside of the selection with black and, after inverting the selection (Selections->Invert), fill the outside with white (see figure 5). The selection can now be undone [CTRL-D], after which a layer is added for further adjustment of the histogram (Layers->Add New Adjustment Layer->Curves). We give the curve an S-shape, so that the background becomes dark, while the prominences remain clearly visible (see figure 6). The advantage about this Curves layer is that, if necessary, it can easily be adjusted again after the editing has been completed. It does not matter for this workflow whether the correction layer is placed above or below the mask. This is also the time to give the new layers a name, so that we can immediately see what each layer does exactly. If there are bad pixels in the background, they can be removed with a median filter (this can also be done later in the last steps of the process after colouring). To do this, the selection from disk is reloaded and expanded so that the prominences are inside the selection (Selections->Modify->Expand). Optionally, the selection can then be given a large outside-feather for a smooth transition (for example 30px). Finally, the selection is inverted and a median filter is applied (Adjust->Add/Remove Noise->Median filter , 3px or 5px). The selection can then be undone with [CTRL-D]. This completes the processing for the prominences and the surface detail can be tackled. Surface DetailFor the surface detail we start by creating a new Duplicate of the background. A mask is added to this copy, using the same selection again, but now the inside is made white and the outside black. The selection can then be undone. We now have a group of layers with a Copy of Background and a Mask inside. Two more copies are made of that Copy of Background via Duplicate and we call the first one Soft Light and we set the Blend Mode to Soft Light if (Layers->Properties->Blend mode: Soft Light, or simply toggle the Blend Mode in the Layer palette, see figure 7). This Blend Mode from the first copy enhances the contrast of the surface detail. Artificial flatThe second copy we call Artificial Flat. With this layer we try to make the surface more evenly lit. To do this, we apply a Gaussian blur of 9px (or slightly more, the point is that there is no surface detail visible any more) and we set the Blend Mode to Difference (don't be alarmed, everything will be black, but that will be fine). Then we set the Opacity to about 50%. Finally, as with the prominences layer, we add a Curves-Correction Layer and adjust it until the surface detail is clearly visible (see figure 8). It is important to do this as well as possible, this adjustment ensures the end result! This group and underlying layers are also given names that make them easily recognizable. Now it is important to inspect the solar edge properly and adjust it with a mask if necessary. Solar rimWe want to try to connect the solar rim as smoothly as possible to the surface detail. I will show this here using a single mask, but of course the edge itself can also be broken up again or given a gradient to improve the connection even further. We start by making a copy of the Background and placing it at the very top of the Layer Palette. Next we add a Hide-all mask and load the saved selection. Make this selection into a narrow band with the Select Selection Borders tool (Selections->Modify->Select Selection Borders), the number of pixels of course depending on the width of the sun border (see figure 9). Finally, give a few more pixels of Feather to this selection. Fill the area so selected with white and deselect. Now, as with previous masks, we can create a Curves-correction layer and use it to influence the brightness of the border until it is no longer noticeable. If necessary, the mask can be cut into parts to darken or lighten parts of the border. Alternatively, the white of the mask can be replaced with a gradient. Now that this is done, colour can be applied. ColouringColouring the image can basically be done as explained in Part 1. However, we first have to merge the three groups. The easiest way to do this is to choose Merge->Merge Visible To New Layer in the Layer Palette with the right mouse button (or via Layers->Merge->Merge Visible To New Layer). This new layer will be placed at the top of the Layer Palette and will no longer 'listen' to the underlying layers. With Adjust->Hue and Saturation->Colorize the colour can be adjusted (Hue: 23, Saturation: 201, or your own preference). The disadvantage of this method is that, because there is no longer any link to the underlying layers, we have to discard this layer if the result is not satisfactory. To keep things dynamic, it is better to create a new raster layer and place it on top. Give it the desired colour, for example by filling it with a mid-tone gray and adjusting the colour with Adjust->Hue and Saturation->Colorize (Hue: 23, Saturation: 201, or your own preference). Next we set the Blend Mode to Color. Then we add another Curves correction layer to further enhance the colouring (see figure 10). Of course, this colouring can also be done per group, for example to give the prominences a more red tint than the surface detail. If all is well then the image can be saved as a single layer, although it is useful to save the edits as well by saving the image as a .pspimage-file. Since I'm using a diagonal blocking filter, I'm left with mirroring the image. Then crop if necessary and paste in an Earth-to-scale (and in this example remove the time-stamp). The final result can be seen in figure 11: Further reading: If you have any questions and/or remarks please let me know. |
InFINNity Deck... Astrophotography... Astro-Software... Astro Reach-out... Equipment... White papers...
Hardware... Imaging...
Imaging artefacts Optimal focal ratio (part 1) Optimal focal ratio (part 2) Solar imaging (part 1) Solar imaging (part 2) Solar imaging (part 3)


